为什么会有这个包?
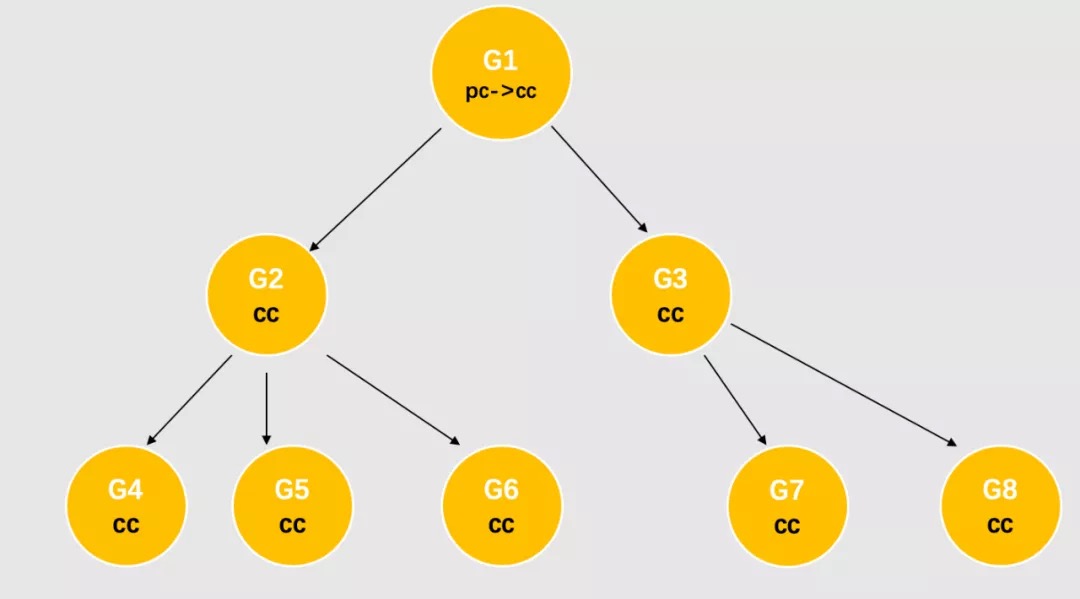
我们知道goroutine之间是相互独立的,没有父子关系,一个goroutine无法主动关闭另一个goroutine,只能通过通道发送退出信息来达到这个目的。如果只是两个goroutine通信还好,但实际业务中很有可能出现如下图一样的多层goroutine调用。所以需要一个更好的方案完成若干goroutine统一退出的功能,context包应运而生。
使用方式
context可以直接在各个goroutine中传递(通常作为第一个参数),也可以通过包中的WithCancel、WithDeadline、WithTimeout、WithValue等方法派生出新的context。多级context构成如上图一样的树结构,只需要在根节点context执行取消命令,就可以通知所有的子节点。
 1
 2
 3
 4
 5
 6
 7
 8
 9
10
11
12
13
14
15
16
17
18
19
20
21
22
23
24
25
26
27
28
29
|
func work(ctx context.Context, name string) {
    for {
        select {
        case <-ctx.Done():
            return
        default:
            fmt.Println("I'm ", name)
            time.Sleep(time.Second)
        }
    }
}

func main() {
    ctx1, cancelFun := context.WithCancel(context.Background())
    go work(ctx1, "work1")
    ctx2, _ := context.WithTimeout(ctx1, time.Second*2)
    go work(ctx2, "work2")
    ctx3, _ := context.WithDeadline(ctx2, time.Now().Add(time.Second*3))
    go work(ctx3, "work3")

    time.Sleep(time.Second * 1)
    cancelFun()
}

输出如下
I'm  work2
I'm  work1
I'm  work3
I'm  work3
|
上述代码中,各context之间形成了Background() -> ctx1 -> ctx2 -> ctx3的层级关系。work2和work3本来可以分别执行2秒和3秒,但是由于主协程直接调用了ctx的取消方法,ctx2和ctx3也相应取消。
那么context是如何做到这个功能呢?我们一起来看一下源码(go 1.15.5)。
源码解析
1
2
3
4
5
6
7
|
// 所有的context都要满足这个接口
type Context interface {
    Deadline() (deadline time.Time, ok bool) // 返回当前context的截止时间。ok等于false表示没有截止时间
    Done() <-chan struct{} // 返回一个通道作为退出信号,通道关闭时,goroutine需要退出
    Err() error // Done通道关闭后,Err表示关闭的原因。是调用了取消函数还是超过了截止时间
    Value(key interface{}) interface{} // 反正这个context中某个key对应的值
}
|
context包里提供了两个background和todo两个变量可以作为根context使用,而这俩变量本质上都是一个emptyCtx,只是语义上略有不同。当你明确需要一个context时应该使用background,而只是想预留一个参数位置时应该使用todo。emptyCtx的代码非常简单,它基本什么都没有干。
 1
 2
 3
 4
 5
 6
 7
 8
 9
10
11
12
13
14
15
16
17
18
19
20
21
22
23
24
25
26
27
|
type emptyCtx int

func (*emptyCtx) Deadline() (deadline time.Time, ok bool) {
    return
}

func (*emptyCtx) Done() <-chan struct{} {
    return nil  // 这里顺便提一嘴,读取一个nil的通道会永久阻塞,所以业务代码里用select case结构读这个通道也符合emptyCtx没有超时时间的语义
}

func (*emptyCtx) Err() error {
    return nil
}

func (*emptyCtx) Value(key interface{}) interface{} {
    return nil
}

func (e *emptyCtx) String() string {
    switch e {
    case background:
        return "context.Background"
    case todo:
        return "context.TODO"
    }
    return "unknown empty Context"
}
|
WithCancel、WithDeadline、WithTimeout可以分为两类。WithCancel单独是一类,返回了一个用于取消的函数,由业务代码控制何时取消。而WithDeadline、WithTimeout在此基础之上,增加了一个计时器,到了时间自动执行取消函数。
1
2
3
4
5
|
func WithCancel(parent Context) (ctx Context, cancel CancelFunc) {
    c := newCancelCtx(parent) // 返回 cancelCtx{Context: parent}
    propagateCancel(parent, &c) // 把当前context加到父级中,实现父级退出时,子context也退出的功能
    return &c, func() { c.cancel(true, Canceled) }
}
|
可以看到,核心结构体是cancelCtx,我们看一个这个结构体的字段和核心方法。
 1
 2
 3
 4
 5
 6
 7
 8
 9
10
11
12
13
14
15
16
17
18
19
20
21
22
23
24
25
26
27
28
29
30
31
32
33
34
35
36
37
38
39
40
41
42
43
44
45
46
47
48
49
50
51
52
53
54
55
56
57
58
59
60
61
62
63
64
65
66
67
68
69
70
71
72
73
74
75
76
77
78
79
80
81
82
83
84
85
86
87
88
|
type canceler interface {
    cancel(removeFromParent bool, err error)
    Done() <-chan struct{}
}

type cancelCtx struct { // cancelCtx 实现了上边的canceler方法
    Context // 父级context

    mu       sync.Mutex            // 保护下列字段的锁
    done     chan struct{}         // context取消时的通知通道
    children map[canceler]struct{} // 用map存储所有的子级context
    err      error                 // context取消的原因,只有第一次取消时会设置
}

func (c *cancelCtx) Done() <-chan struct{} {
    c.mu.Lock()
    if c.done == nil { // 这里作了懒加载处理
        c.done = make(chan struct{})
    }
    d := c.done
    c.mu.Unlock()
    return d
}

// 第一个参数是取消当前context时,是否脱离父级关系
func (c *cancelCtx) cancel(removeFromParent bool, err error) {
    if err == nil { // 取消时必须传一个取消原因,目前就两种,Canceled表示主动取消,DeadlineExceeded表示超时取消
        panic("context: internal error: missing cancel error")
    }
    c.mu.Lock()
    if c.err != nil {
        c.mu.Unlock()
        return // 如果err不为nil,说明已经取消过了
    }
    c.err = err
    if c.done == nil {
        c.done = closedchan // closedchan是一个已经关闭的通道,代码在init方法里。这里赋值是为了复用通道
    } else {
        close(c.done)
    }
  // 经过上边操作,c.done必然是一个已经关闭的通道了
  // 依次取消子级context
    for child := range c.children {
        // 这里注意一下,当前context的锁还没有释放。多层树状context相当于一个深度优先遍历,子子孙孙都取消之后,当前节点才解锁
        child.cancel(false, err) // 后续会把map置为nil,所以这里不需要在子context脱离父级
    }
    c.children = nil // 所有子context都取消了,这个map也没用了
    c.mu.Unlock()

    if removeFromParent {
        removeChild(c.Context, c) // 脱离父级
    }
}

func removeChild(parent Context, child canceler) {
    p, ok := parentCancelCtx(parent) // 如果父级是cancelCtx,才有脱离的必要。其他结构体不作处理
    if !ok {
        return
    }
    p.mu.Lock()
    if p.children != nil {
        delete(p.children, child) // 脱离的逻辑很简单,就是从父级的map里删除当前节点
    }
    p.mu.Unlock()
}

func parentCancelCtx(parent Context) (*cancelCtx, bool) {
    done := parent.Done()
    if done == closedchan || done == nil { // 这种情况说明父级已经取消或者是emptyCtx,都不需要再管
        return nil, false
    }
  // key为cancelCtxKey时,cancelCtx.Value()会返回自己
  // 思考一下这里为什么用Value方法,而不是直接 parent.(*cancelCtx)
  // 我的理解是如果父级是一个嵌套了cancelCtx的结构体(比如下文要提到的timerCtx),直接转换的话,类型肯定不对
  // 但是用Value方式是可以取到cancelCtx本身
  p, ok := parent.Value(&cancelCtxKey).(*cancelCtx)

    if !ok {
        return nil, false
    }
    p.mu.Lock()
    ok = p.done == done // 假如父级是嵌套了cancelCtx的结构体,可能会有自定义的通道,这种情况不做处理
    p.mu.Unlock()
    if !ok {
        return nil, false
    }
    return p, true
}
|
从上面代码可以看出,取消当前节点时取消所有子级节点的逻辑是很清晰的,那创建当前节点时需要通过propagateCancel方法将当前节点和父级绑定。
 1
 2
 3
 4
 5
 6
 7
 8
 9
10
11
12
13
14
15
16
17
18
19
20
21
22
23
24
25
26
27
28
29
30
31
32
33
34
35
36
37
38
|
func propagateCancel(parent Context, child canceler) {
    done := parent.Done()
    if done == nil {
        return // 父级是emptyCtx,不需要退出,也就没有绑定的必要
    }

    select {
    case <-done:
        // 如果父级已经取消了,直接取消子节点就完事了
        child.cancel(false, parent.Err()) // 这个时代还没有绑到父级map里,所以取消时也不需要解绑
        return
    default:
    }

    if p, ok := parentCancelCtx(parent); ok { // 如果父级是cancelCtx,就把当前节点加到map中
        p.mu.Lock()
        if p.err != nil {
            // 父级已经取消,当前节点也直接取消就完事了
            child.cancel(false, p.err)
        } else {
            if p.children == nil {
                p.children = make(map[canceler]struct{})
            }
            p.children[child] = struct{}{}
        }
        p.mu.Unlock()
    } else {
    // 父级节点如果不是cancelCtx,单独起一个goroutine来监听父级通道
        atomic.AddInt32(&goroutines, +1) // 这个计数只是为了测试目的,没有实际作用
        go func() {
            select {
            case <-parent.Done():
                child.cancel(false, parent.Err()) // 父级取消则取消当前节点
            case <-child.Done(): // 当前节点先于父级取消,没啥可干的,直接退出
            }
        }()
    }
}
|
cancelCtx基本就是上边的流程。接下来看一下WithTimeout和WithDeadline是什么实现的。WithTimeout调用了WithDeadline,所以只看WithDeadline即可。
 1
 2
 3
 4
 5
 6
 7
 8
 9
10
11
12
13
14
15
16
17
18
19
20
21
22
23
24
25
26
27
28
|
func WithDeadline(parent Context, d time.Time) (Context, CancelFunc) {
    if parent == nil {
        panic("cannot create context from nil parent")
    }
    if cur, ok := parent.Deadline(); ok && cur.Before(d) {
        // 如果父级的超时时间比当前节点还早,意味着父级一定会先取消,当前节点再设置过期时间就没有意义了,直接返回一个cancelCtx即可
        return WithCancel(parent)
    }
    c := &timerCtx{  // 这里可以看到,实现定时取消功能的核心结构体是timerCtx,其中包含了cancelCtx
        cancelCtx: newCancelCtx(parent),
        deadline:  d,
    }
    propagateCancel(parent, c) // 绑定到父级中,和cancelCtx是一个流程
    dur := time.Until(d)
    if dur <= 0 {
        c.cancel(true, DeadlineExceeded) // 如果超时时间设置得太短,执行到这里时已经超时了,那就直接取消
        return c, func() { c.cancel(false, Canceled) }
    }
    c.mu.Lock()
    defer c.mu.Unlock()
    if c.err == nil {
    // 这里生成一个定时器,定时器触发时执行取消方法
        c.timer = time.AfterFunc(dur, func() {
            c.cancel(true, DeadlineExceeded)
        })
    }
    return c, func() { c.cancel(true, Canceled) }
}
|
接下来看一下timerCtx的核心方法。
 1
 2
 3
 4
 5
 6
 7
 8
 9
10
11
12
13
14
15
16
17
18
19
20
21
22
23
24
|
type timerCtx struct {
    cancelCtx
    timer *time.Timer // 既然是定时取消,必然有一个定时器。操作这个字段时复用cancelCtx里的锁

    deadline time.Time // 超时时间
}

func (c *timerCtx) Deadline() (deadline time.Time, ok bool) {
    return c.deadline, true
}

func (c *timerCtx) cancel(removeFromParent bool, err error) {
    c.cancelCtx.cancel(false, err) // 核心还是cancelCtx的流程
    if removeFromParent {
        // 解除父级绑定关系
        removeChild(c.cancelCtx.Context, c)
    }
    c.mu.Lock()
    if c.timer != nil {
        c.timer.Stop() // 这里注意要即时停掉计时器,不然会有内存泄露的风险
        c.timer = nil
    }
    c.mu.Unlock()
}
|
存疑
上边的源码解析,我刻意回避了WithValue和Context.Value方法,原因是我实在没有搞明白context传值为什么要这么设计。
按照常规的思维,既然是存键值对,那我直接搞个map就好了,但是context包中的valueCtx只能放一个键值对,如果要有多个键值对,就需要创建多级context。另外,代码注释里还明确提到不应该使用string等内建类型作为key,目的是避免多个包共用context会产生冲突的问题。
真心对于Value的使用不是很明白,如果有懂的大佬请不吝赐教!
参考资料
- 理解Context机制
- Go Concurrency Patterns: Context
- Golang 并发 与 context标准库
- Context Deadlines and How to Set Them